Wovens to Knits Fleece Duffle Coat Featuring Peek A Boo Patterns and Raspberry Creek Fabrics

Welcome back to Wovens 2 Knits, our monthly series where we take a pattern that was drafted for wovens and see how it translates in comfy, cozy knits. This month is extra exciting, too, as it’s the first post that’s being sponsored by the fantastic Raspberry Creek Fabrics. I’ve bought designer wovens from them for years, but they’ve recently skyrocketed in popularity thanks to the super soft and reasonably priced french terry that they keep in stock (and regularly re-stock) along with a nice selection of other knit apparel fabrics. And did you know they’ve got their OWN fabric line now, too?? They call them their CLUB fabrics, and the first collection has included 6 cotton/lycra prints and one in french terry. The price is fantastic (under $11/yd!) and the quality is even better. I’ve washed and worn a few of the prints that I had preordered, and they’re still looking great.

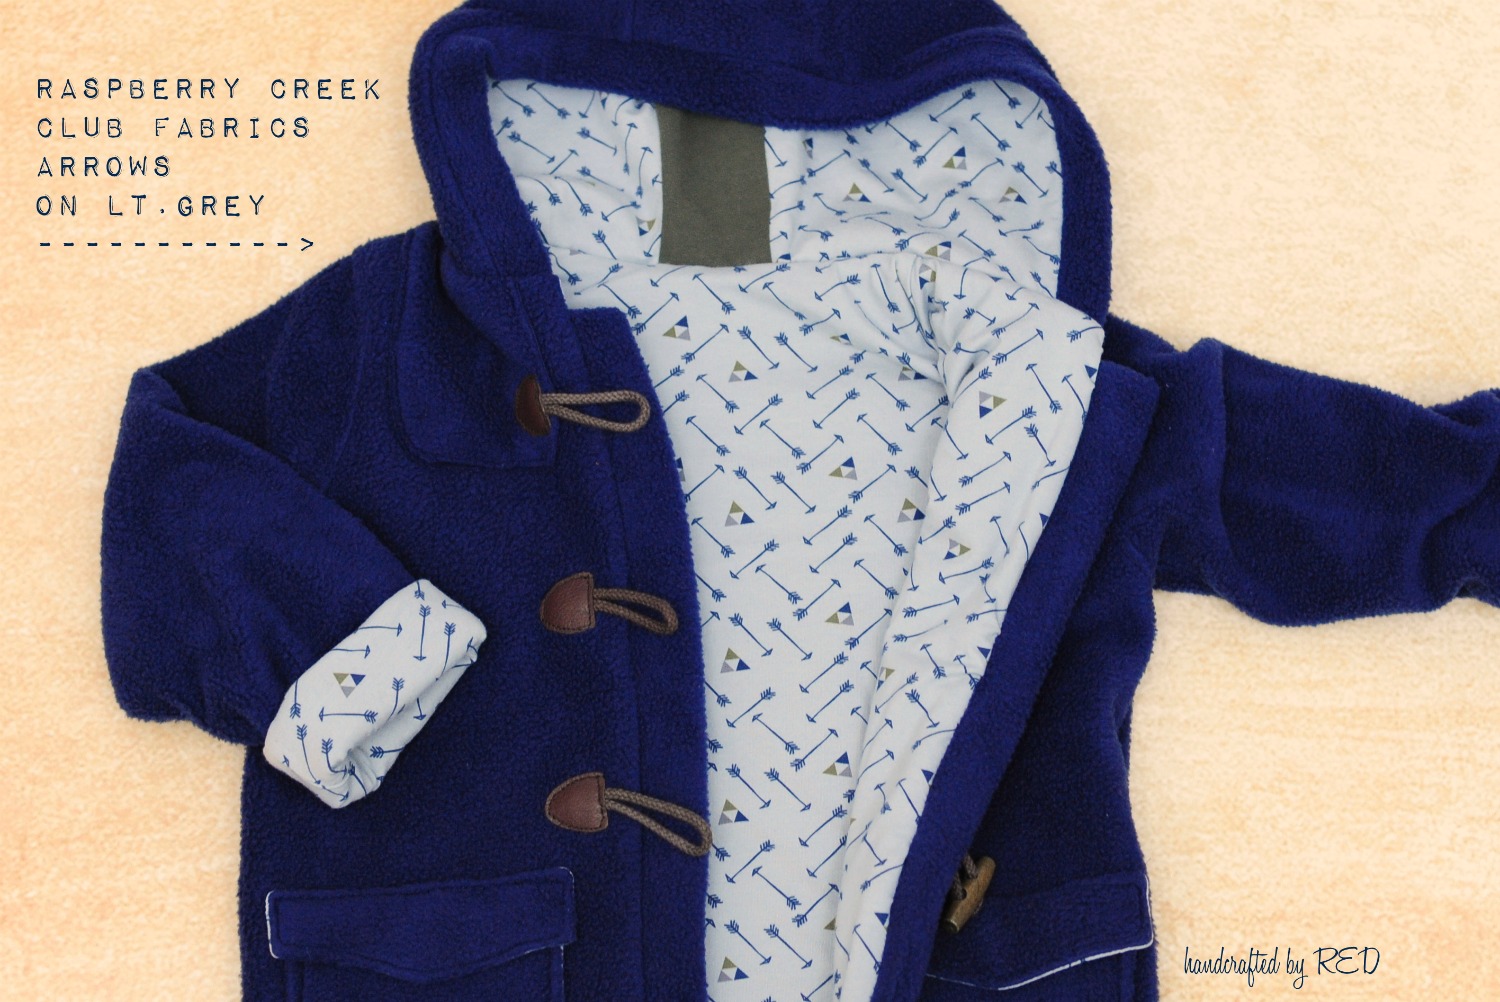
For this post, I wanted to make a duffle coat for my little guy, and envisioned it in a nice fluffy fleece. I love the classic look of a wool duffle coat, but “Dry Clean Only” isn’t really a label that’s compatible with my three-year-old. ;) I picked out a navy blue fleece remnant from my stash (I like to stock up on Anti-Pill fleece solids at Joanns when they’re in the remnant bin) and Diana from Raspberry Creek generously sent over some yardage of the light grey arrows and triangles CLUB fabric that I used for the lining. It is heavenly, and soooo soft!

I used the Downton Duffle Coat from Peek-a-Boo Patterns for the coat, and since my little guy was right between the size 3 and size 4 (which is consistent with what I’ve found with RTW styles lately too) I opted to size up to the 4. Usually with knits I’d consider using the smaller size, but in this case since the coat was going to be lined and for layering I figured it would be ok. And it was, for sure. (Added bonus: hopefully this will still fit him in the spring, too!)

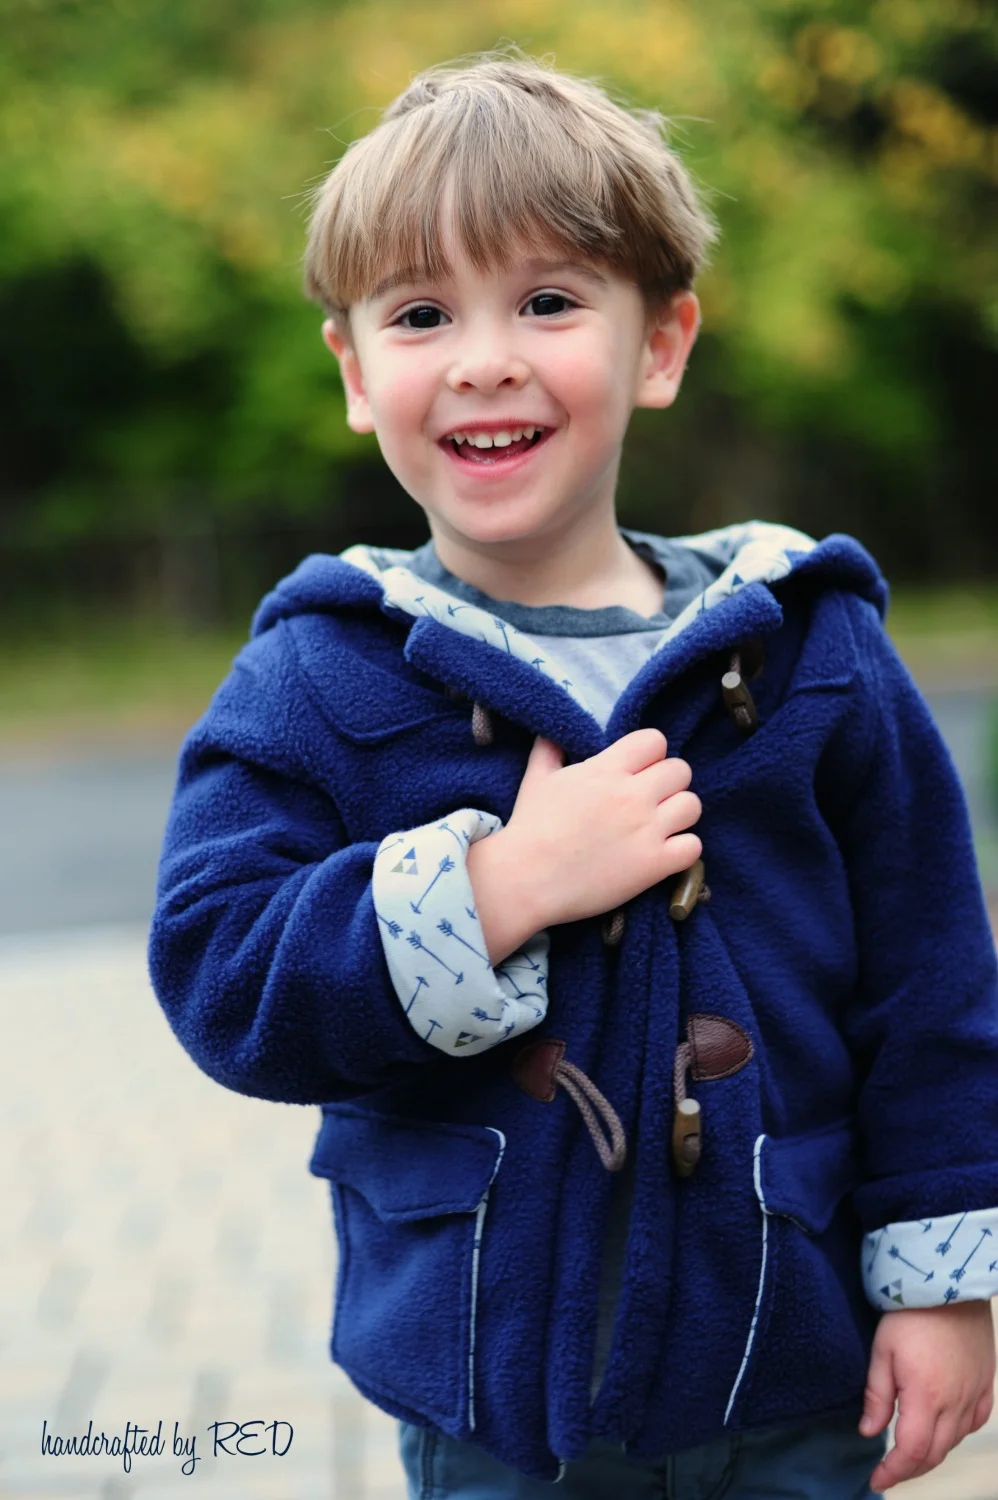
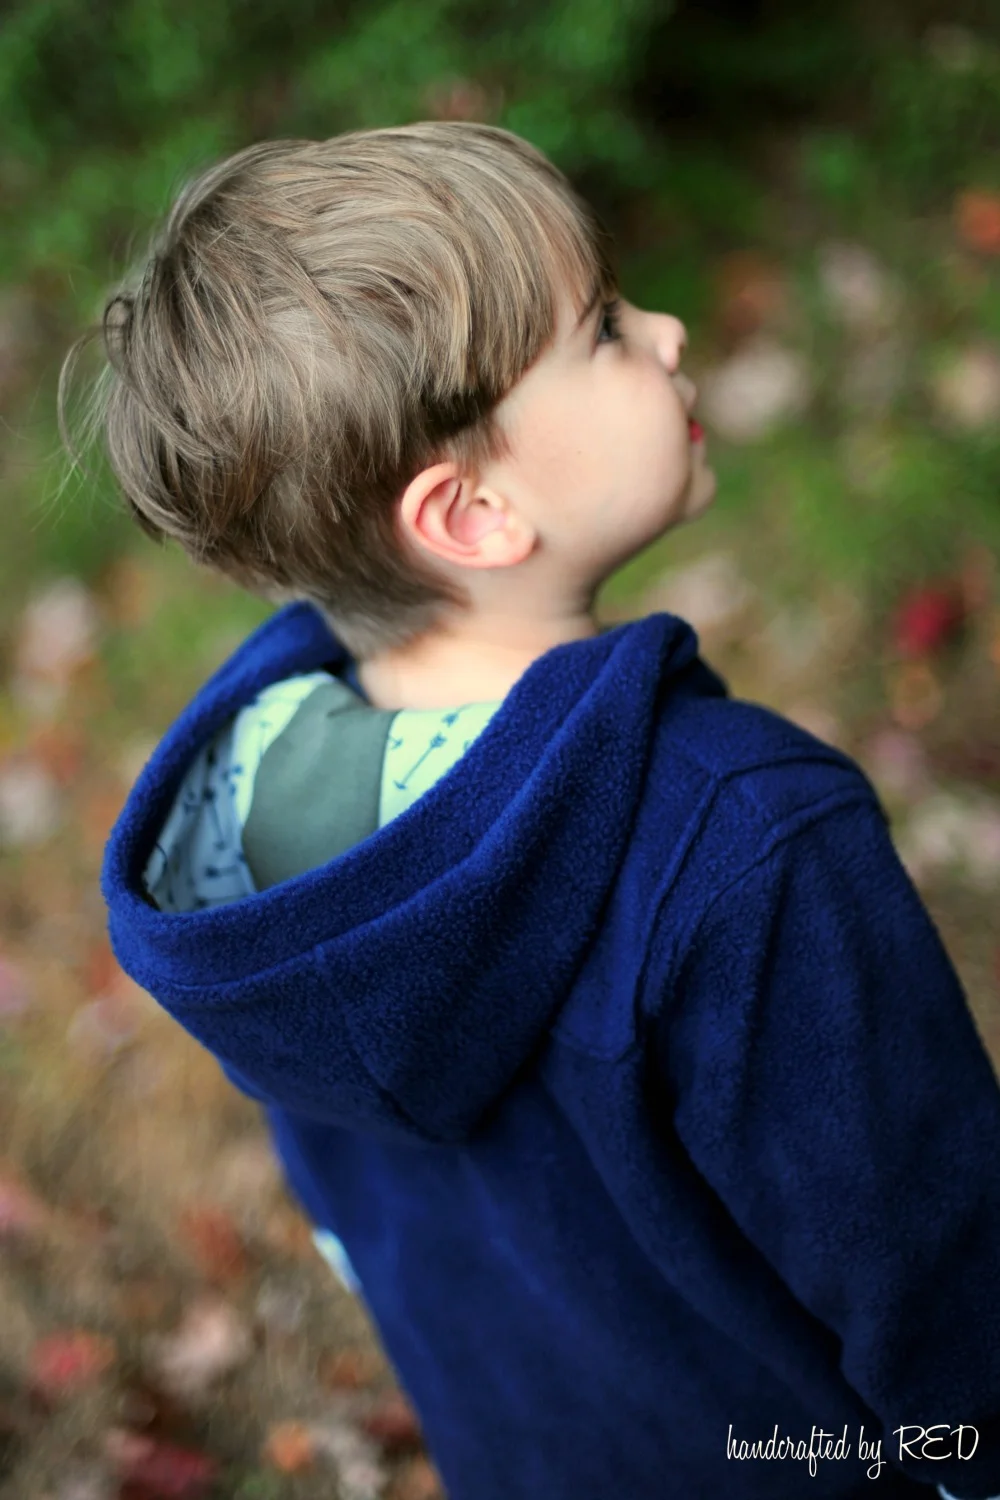
Construction was straightforward and well laid out in the tutorial, and the coat came together pretty easily. My machine wasn’t playing nicely with the faux-leather on the toggles I’d picked up from Joanns, so I ended up taking those tabs off and making my own with leather scraps that I had in my stash from an old pair of baby moccasins. If you’re sewing a jacket with fleece, I highly recommend topstitching with a long straight stitch as it makes for a nice, finished look. The three piece hood is probably my favorite feature of this coat, it’s a great place to show off a small piece of contrasting fabric (or use stripes in different directions). I opted to leave off the zipper this time, since my kiddo is very into getting himself dressed these days and I thought the toggles alone would be easier for him. And they are, but the coat doesn’t stay completely closed all the time - if I do that again, I’ll have to adjust the toggle placement a little to make sure the coat stays nice and snug instead of floating open behind the toggles.

This is one of those patterns that I’ve had in my stash since it was released nearly two years ago, and have never gotten around to sewing it until now. I’m so glad that I did - it was the perfect pattern for my vision of a fleece duffle coat, and the full lining helped everything look great on the inside, too. Make sure to check out RCF for their Club fabrics and more, and join all of us over on Facebook to share your latest Wovens 2 Knits creations!

Until next time,

Rachel

Visit our Sponsor


Design Your Own Princess Sew Along - DAY 1

Day 1 of the 'Design Your Own Princess Sew Along' starts today! We have some awesome ladies that will be showing you how to take one of three patterns and turn it into everyday wear for your princess at home. Sew along with us for a chance to win some awesome prizes at the end of the week. Choose one of the three sponsored patterns, we can't wait to see what you have created! Violet Field Thread's Cosette, Boo! Design's Grace, or the Made for Mermaid's Molly are the perfect canvas to start your Princess outfit off right. If you haven't already, and would like the "sewcial sewing experience" join the Pattern Revolution Group on Facebook. Here you can share your in process photos, ask questions, brainstorm, and share inspiration. Plus we'll be sharing how to create even MORE princess looks in the group! 

Day 1:

  • Choose the pattern that best fits your style.
  • Choose which princess or character you are wanting to create.
  • Sketch out a plan.
  • Go shopping! (Seriously the best part, right?)

Princess #1 - Tinkerbell

Pattern: VFT Cosette     Created by: Serena

I used a free paper doll printable from Lil Blue Boo to sketch out my plan of attack. I decided to make a double square skirt so that it was frilly and twirly, the top part is a circle cut extra large to give it a twirly fullness. To figure out the square skirt I followed this tutorial over at Make it & Love it to get an idea of how to cut the circle and then I just added to the circumference to make it extra full.

Princess #2 - Elsa

Pattern: M4M Molly     Created by: Lisa

Hi there!  For the sew along my daughter chose Elsa and Anna.  I will be using the The Molly top tunic and dress pattern by Made For Mermaids for the Elsa dress.  For the fabrics I will be using 100% cottons with a little bit of blue sequins on the bodice.  I will also use some shiny silver trim.  There will be a few minor modifications to achieve the look I want.  Details on those later.

Princess #3 - Anna

Pattern: Boo! Grace     Created by: Lisa

Since my daughter couldn't decide on one character we are making an Anna dress too!  This time I'm using the Grace dress by Boo Designs.  Grace dress has 5 skirt styles, I'm doing the Vanilla skirt it is a little less full.  Again I will be using 100% cottons and a gold trim.  I have a few modifications to make on this one too.  Come back tomorrow for more details.

Princess #4 Belle

Pattern: M4M Molly Created by: Sarah

Hi! This is Sarah and I used the Molly pattern by Made for Mermaids to make a Belle tunic.  To make your own Molly Belle, you will need all of the notions and fabric listed in the pattern, plus:

  • Extra fabric for the overskirt (I took the length of the skirt and multiplied it by 1.5.  Since you will need two of those      pieces, you will need enough extra fabric to cut both pieces.  For the size 10, I needed and extra 1.5 yards.)
  •  One spool of ¾” or ⅝” ribbon
  • Wash Away Wonder Tape (optional, but it really makes life easier!)
  • A pin on flower or supplies to make your own flower for the bodice.  

Princess #5 Frozen Fever Elsa

I’m totally addicted to PRINCESS!!

Any excuse I have to create a certain character for my girls to enjoy and love wearing makes it worth all the time I spend planning and usually mashing up a few different patterns to create the look I envisioned.

When I signed up to be apart of this sew along… I was so excited about the theme of the sew along. I had to think what Princess do I want to create and naturally I will be doing two looks but, only showing step by step for one.

Bella and Clara Mae are obsessed with Frozen. {What child isn’t though :) } So I took on the challenge of doing Frozen Fever inspired looks and for the sew along I will be doing the Ice Queen herself. Snow Princess I’ll link up after the sew along is done.


See you all tomorrow for DAY 2, we'll be cutting everything out!

Serena

Canadian Designer Blog Tour- Featuring Filles A Maman

We've loved getting to know Mel Henry over the last year at Pattern Revolution, so when there was an opening to feature her as a part of the Canadian Blog Tour, we jumped on it. Not familiar with Mel? You can read more about her HERE

If you've never tried a Filles a Maman pattern, now is the perfect time to try one with Coupon code is CANADATOUR good for 30% off everything on her website only.  Valid from June 22 to 25th (ends at midnight). Also, there is a giveaway at the end of this post  for one pattern of choice, plus a link to the huge grand prize giveaway for the entire Canadian Tour valued at over $400!

Today we have two talented seamstresses, Lisa and Denita featuring the Mimi and Marc patterns like you've never seen them before. 

Lisa here from lisalisa Designs sharing my version of the Mimi dress pattern by Filles a`Maman. I have used other patterns by this designer, so I knew there would be no problems understanding her instructions.  I always enjoy working with Filles a` Maman patterns!

When I saw the Mimi dress was an option for this tour, I knew right away what I wanted to sew.   The Mimi dress and top pattern provides a tutorial for adding fringe to the neckline but my daughter wanted something a little different.  She is really into fringe lately and this dress was based off an inspirational picture she found on Pinterest a while ago.  Yes, my 5 year old daughter has mastered pinning like her mamma!!

To get this look I added extra fabric pieces to the side seam by sandwiching them in between the front and back dress pieces.  Once the dress was all put together I just cut strips from the extra fabric I added to create the fringe.  The sparkle is glitter iron on vinyl I cut with my Cricut.  


My daughter was super excited about this dress and said it looked just like the dress she pinned!

Thank you Pattern Revolution and Files a` Maman for helping me make my daughter Sparkle!

Lisa


H,i it’s Denita from HattieLu Handmade. I’m honored to participate in the Canadian Designer's Blog tour hosted by Lulu & Celeste. Mel Henry is the face behind Filles a Maman. Her patterns are available for girls, boys, and women. Filles a Maman is relatively new to me; however, the company is not new to the sewing world.

Today is all about Marc’s Shirt! Marc’s is available in sizes 12 months to 14 years. The pattern is written for short and long sleeves. The most unique feature about Marc’s is the woven asymmetrical collar. You’ll be able to add a special flare especially for your little one. Choose from buttons, KAM snaps, or a zipper. Your imagination is the only limit. The shirt is made from knit.

I sewed up simple versions of Marc’s Shirt for my three littles. Each of them picked the KAM snaps they wanted to use. My oldest picked glow in the dark, middle picked white, and youngest picked blue. It’s fun watching their creativity show in simple features. One tip: have your child try on the shirt before sewing the buttons. This tip helps if you have a sensory sensitive child. As you can see, my littles love their Marc’s Shirt. Thanks to Purpleseamstress Fabric on Facebook for the airplane fabric.

Here are some of the pattern details:

  • Seam allowances 3/8" included

  • Instructions are very thorough

  • Metric and imperial charts for finished garment measurements

  • Charts for fabric requirements

  • Designed for knits like cotton jersey, cotton spandex, cotton lycra, interlock on the shirt body.

  • Possibilities are endless for the collar, shoulders and facings using woven fabric

  • Detailed tech drawing included in the instructions

  • Intermediate pattern; could also be great for confident beginner

I would like to personally thank Mel Henry. I was having a lot of trouble understanding how the collar when together. She took time in between cooking dinner for her littles, their bath and bedtime to help me understand. I am beyond appreciative of Mel’s help!!! Pattern Revolution has reviewed Filles a Maman’s patterns. You can read more reviews here. Simple and easy to construct, Marc’s Shirt is a great way to showcase your child’s style. Are you ready to make Marc’s Shirt for your special little one?

Catch up on what you've missed by heading to the first day of the tour at Lulu & Celeste, you'll be able to find all the designers and bloggers involved in this event and sew along link ups and more giveaways!

Until we meet again! Remember, it’s all about the sewing!

Denita

Win 1 Pattern of Choice

Click image below to visit the huge tour giveaway.

Visit the other Tour Stops

Crystal's Double Duty Hoodie

Crystal's Double Duty Hoodie

Hey! I am Crystal, I am mommy to a one year old daughter and two year old son. In my spare time I love to sew and blog about it over at Stitched by Crystal. I was given the Fishsticks Designs Charlie Tee and Hoodie pattern to make a sweatshirt for my son.  Not just a plain old hoodie though, I was asked to get creative and put a fun spin on the pattern.  No problem! I love doing stuff like this!

Read More