
Design Your Own Princess Sew Along - DAY 3
/Day 3 of Design Your Own Princess Sew Along is under way, only one more day to go and your little diva will be showing off her new outfit! Post your photos and questions in the Pattern Revolution Facebook group page for a chance to win some awesome prizes!
Day 3:
- Construct bodice & arms.
Princess #1 - Tinkerbell
Pattern: VFT Cosette Created by: Serena

I changed up the bodice main part to give it the whimsical curve, taking note not to make it too low on her chest. The VFT Cosette pattern gives a generous length to the bodice so that you can do this sort of modification. The arm straps and flutters are from the pattern.
Princess #2 - Elsa
Pattern: M4M Molly Created by: Lisa
Yesterday I showed you how I split my bodice up into two pieces, today we’ll put them together! For the most part I followed the original directions to the pattern. The only change I made was to connect the blue sequins fabric and white fabric together. This is done by placing them right sides together and sewing using a ½” seam allowance. Do this for for both front and back bodice. After those pieces are connected I followed the rest of the instructions as written. The last thing I did was added the silver trim right where the two pieces connected.
Princess #3 - Anna
Pattern: Boo! Grace Created by: Lisa
With this pattern I did have to attach the skirt to the bodice as part of the bodice construction. The only change to the original directions was to add the gold trim. After constructing the straps as written I top stitched the gold trim to the inside edge of each strap before attaching them to the bodice. For the gold trim on the front bodice I sandwiched that in between the bodice main and bodice lining (under the straps). That is the only modification I made! the rest of the bodice was constructed as written.
Princess #4 - Belle
Pattern: M4M Molly Created by: Sarah
For the bodice construction of the M4M Molly Belle adaption, I just assembled according to the pattern directions. The wow in this dress comes directly from the skirt (more on that tomorrow)! I added a cute flower to the bodice to give it a personalized touch. There are plenty of tutorials on fabric flowers on PInterest.
Princess #5 - Frozen Fever
Pattern: All 3! Created by: Nicole
For the sweetheart overlay I’m using the Molly I am using the tone on tone dots. For the Cosette I’m using fairy frost. I also create an overlay on the back bodice I just lined up where my overlay was and accounted for SA.

When doing a sweetheart you will need to cut 2. A little tip I cut my sweetheart length up on my overlay so I don’t waste as much fabric. I did ½ SA to sew the main sweetheart and lining sweetheart together. I did choose to start my seam on the edge so it would still line up properly with the Cosette. I did extend my side seams out a little extra and just cut off after I was done top stitching. So once you have your sweetheart pieces sewn take a pair of scissors and cut a v shape at the center of the dip, then with pinking shears go over the curve. If you don’t have pinking shears make sure to cut down some of your SA then being ever so careful make small cuts at the curve not cutting into your stitching.

Turn right side out and press.Then put your overlay onto your bodice and make sure everything lines up. Then you can either pin in place, use a basting spray, or wash away hem tape to secure the overlay in place. Then top stitch. I also like to take the additional time to baste stitch around the entire overlay to main bodice so later on I don’t have to bother with making sure my bodice, overlay, and skirts all line up.
I followed the construction of the straps and ruffles according to the tutorial of the Cosette. Same with attaching the bodice lining to the main. **A tip on the ruffles I like to baste mine on to make sure that I position them correctly and make sure they are even on both sides then after sewing the straps and ruffles together I unpick my baste stitch.

For the back bodice, I cut out my pieces and extended my overlay piece in slightly when cutting to trim off after I had top stitched. For the overlay you will serge the top edge, then iron the seam down. Again using pins, spray, or tape to secure in place. Before you top stitch you need to make sure your back overlay will match up with your front overlay. I took clips and clipped my side seams together to ensure it all lined up. This is an important step!! If you need to adjust the back bodice overlay any this is the perfect time to do it. That is why I cut my overlay extra in WxL if I need to adjust any to line up my overlays. Once everything is lined properly top stitch your back overlay to the back piece. If you have any excess overlay on the bottom edge just trim off. I once again, take the time to baste stitch my overlay to my back bodice.

For the back bodice construction I followed the direction of the Molly. I cut a lining piece the same WxL. Same with the back loop 1x4. I started by getting my back loop all ironed and top stitched. Then I found the center of my main back bodice, once I found that I followed Molly & Cosette tutorial for marking my elastic lines, inserting my elastic. I spaced my elastic casing at 1” from the top and then another 1” after that.

Now you will notice since you strayed away from the Cosette instructions adding in all the Molly influences you will notice a small gap of extra back bodice to front bodice yikes… I Tim Gunn it and “Made it Work” So to fix this issue I didn’t see coming up until I was nearly finished with my bodice construction I serged my side seams together, then I tucked my extra back bodice into my front bodice like I have shown in my photos and just top stitched that little piece.

Oh my goodness!! You are halfway there to having a finished Frozen Dress. Step back and marvel in your awesomeness as your bodice is now completely finished!!

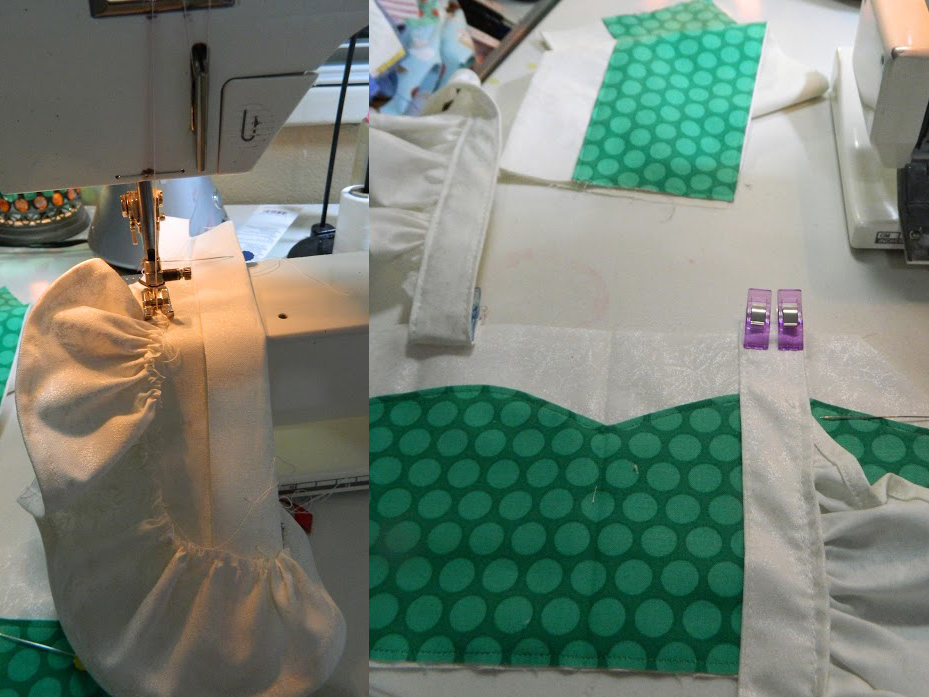
Princess #6 - Ariel
Pattern: VFT Cosette Created by: Ari
Using the Cosette Dress pattern by Violette Field Threads, I’m thinking of splitting it into a cropped top with a skirt. I’ll keep the top fairly original to the pattern, and I’m not sure exactly how the waistband will be constructed, I tend to make things up as I go along, but for now I’m going to use an elasticated waistband with a sort of ‘collar’ across the top to emulate the top of Ariel’s tail. I sort of want to make it a maxi skirt with all the ruffles but we’ll see if I change my mind halfway through.

Working on the bodice I realised I needed something more. The fabric is pretty, but I just needed more, so I quickly cut out and sewed two extra flutters in pretty purple I salvaged from a mens button-up shirt. I’ve layered them over the original flutters. I really would have loved some sort of purple netting but I only had pink, black, white or green and I’m not sure any of those were exactly right for what I had in mind.

Make sure if you’re doing multiple flutters that you sandwich them right, as in the main flutter should be as far away from the strap as possible when you’re pinning and sewing at step 13 (for the VFT Cosette Dress). Don’t ask me how I know to tell you this… Because I am doing the dress as separates, I’ve skipped into the skirt section and constructed the bodice as one piece (the original instructions have you do the front bodice & skirt as a piece and the back bodice & skirt as a second piece). It’s a bit tricky from this photo, but after threading and securing the elastic at the back bodice, I have sandwiched it between the front bodice and the front bodice lining, stitching down the side seam.

At this point I measured the bottom circumference of the top and cut myself a nice little band. Keeping it flat at the front to stay with the style of the top, I’ve stitched elastic at the sideseams across the back to pull it in all together!

And viola! My Ariel cropped top is complete!
See you back here tomorrow!


